How to plan a Great Divide Trail (GDT) thru-hike and purchase your permits
I started actively planning my first thru-hike on the GDT 6 months before my start date. At times I felt like this was rushed, but I was able to do it! I will break down my logistic planning and permit purchases below.
Please note: policies and permitting seem to fluctuate a lot. This was my process for 2020 and some things might have changed by the time you’re reading this. I will endeavour to update the information as I learn of any changes, but can’t promise this post will always be up to date.
Okay, so you have the dream to complete a thru-hike of the Great Divide Trail, but you don’t know where to start. I feel you. The planning was honestly the most daunting step of the entire hike. Let’s break it into steps.
Step 1: purchase or borrow the guidebook
If the hike you’re trying to complete has a guidebook, I highly recommend purchasing it. For the Great Divide Trail I used Hiking Canada’s Great Divide Trail by Dustin Lynx (3rd Edition). There are so many alternate routes and so many different permits and parks to piece together that I found the book really informative. I had it open to the maps pages when booking permits to visually see where an alternate permit was located along the route or alternate route. Permits in a lot of sections of the GDT are hard to come by, so being able to be flexible while on the phone with a Park’s staff is really helpful. There were a few times when I purchased permits for an alternate route instead of the main route because I could visually see the proximity.
I did not bring the book with me on the hike, nor would I recommend it. I found the descriptions somewhat helpful to understand what terrain was coming next, but just using my Gaia GPS was more helpful. I snapped photos of the particularly tricky sounding sections and simply had them saved on my phone.

Step 2: determine how many kilometres per day you can hike
This should be based off your pace on other backpacking trips you’ve done. We all have a different comfortable distance that can be done in a day. I met some hikers who knew they never wanted to hike more than 15 km daily and others that knew they could handle 40 km daily. Be honest with yourself. Some of the days can be slow moving and difficult navigating. Consider that you will mostly be in the alpine when deciding how much distance you can cover in a day. Allow for this in your itinerary.
It’s also very important to not start too strong. As a physiotherapist, I understand the importance of introducing our bodies slowly to an activity. So, if you plan to hike an average of 20 km daily, you should aim to hike 10-15 km for the first few days to warm your body up to it. This will help your tissues adapt to thru-hiking; therefore, decreasing your risk of injury. Account for a slower start at the beginning when calculating your totals.
Step 3: determine how much time you need to complete the hike at your pace
I decided my pace would be 20-30 kms per day. So, my average would be 25 kms per day. For the Section A-F hike with some alternates, my total mileage was ~950 kms. That meant I needed 38 days of hiking to complete the distance.
Then, for each section, I accounted for one zero day of rest. These rest days are really important for overall body health and longevity over a long-distance hike. It is great to fit these rest days in if you can. Since I was doing 6 sections, I needed to add in 5 rest days.
My total days from the start of the hike then ended up being 43 days. I did have a little bit of wiggle room and my hike ended up being 44 days with a couple shorter hiking days thrown in due to permits.
Here is my rudimentary calculator:

Step 4: decide on your rough dates (you may need to modify these if permits aren’t available)
You will need to look at everything in your personal life and work life to determine the approximate dates you can be available for your thru-hike. If you’re flexible, jump to step 5.
Step 5: decide your direction
Your start date will largely determine the direction you want to hike. You are in the alpine for most of the GDT, so the biggest consideration for an early start date is snow levels. The snow levels do vary from year to year, but to be safe you could plan for the snow levels to be high. If you don’t mind moving through snow, then an earlier start date might work well for you. If you would prefer not to walk on snow, a mid-July start date for the GDT in 2020 was perfect for this. I think I walked a total of 50 steps on snow.
The other consideration when choosing a start date and direction is water levels. The later in the summer you travel through the South section, the lower the water levels will be. I hiked Section A from Waterton to Coleman July 21-25, 2020. I was able to find water to drink along the way, but my third day on Barnaby Ridge was sparse.
The glacier-fed streams and rivers in the Northern sections can be incredibly dangerous to cross if the water levels are too high. Hikers typically report high water levels in July/August. We crossed all the major streams at the end of August and early September, and they were all do-able. Read more about our experience on Section D here.
Technically, you can hike the GDT sometime in the window of June-October. June – early July you will likely be walking along snow, July – mid September should be relatively snow-free and mid September – October you will probably start seeing snow again.
If you hike the drier Southern end in late August – early September, you will likely have less water sources for drinking.
For the snow and water reasons listed above, I think that’s why it is more popular to hike the GDT Northbound (NOBO). I heard that many people who had planned a southbound (SOBO) hike for 2020 ended up switching directions due to the snow levels. However, on a lower snow year SOBO would likely be more do-able.
I opted for NOBO mid-July to early September and I loved that timeline. I started at the tail end of thru-hikers, so the trail really didn’t feel busy.

Step 6: plan your itinerary
Now that you know your start date, number of total days, average kms per day and direction, you’re ready to start making that excel spreadsheet! This is the fun and headache provoking part.
My number one biggest piece of advice: make a rough itinerary and be prepared to be flexible with dates and campsites based on permit availability.
Second biggest piece of advice: don’t let the fact that you missed the opening dates for permits scare you off. For my hike I was sometimes trying to book campsites 2 months after permitting opened, but I was still able to snag permits. Don’t give up! You can problem solve on the phone with Park’s staff to get creative for your route. I recommend not being afraid to throw in an alternate route or two if you need to in order to piece your hike together. It is so worth it!
My Detailed GDT 2020 Itinerary
Here is my detailed itinerary you can use as an example or guide when planning your thru-hike. This is based on an average of 25 km per day.
*Please keep in mind that some of this information could be incorrect now due to changes since I hiked in 2020*
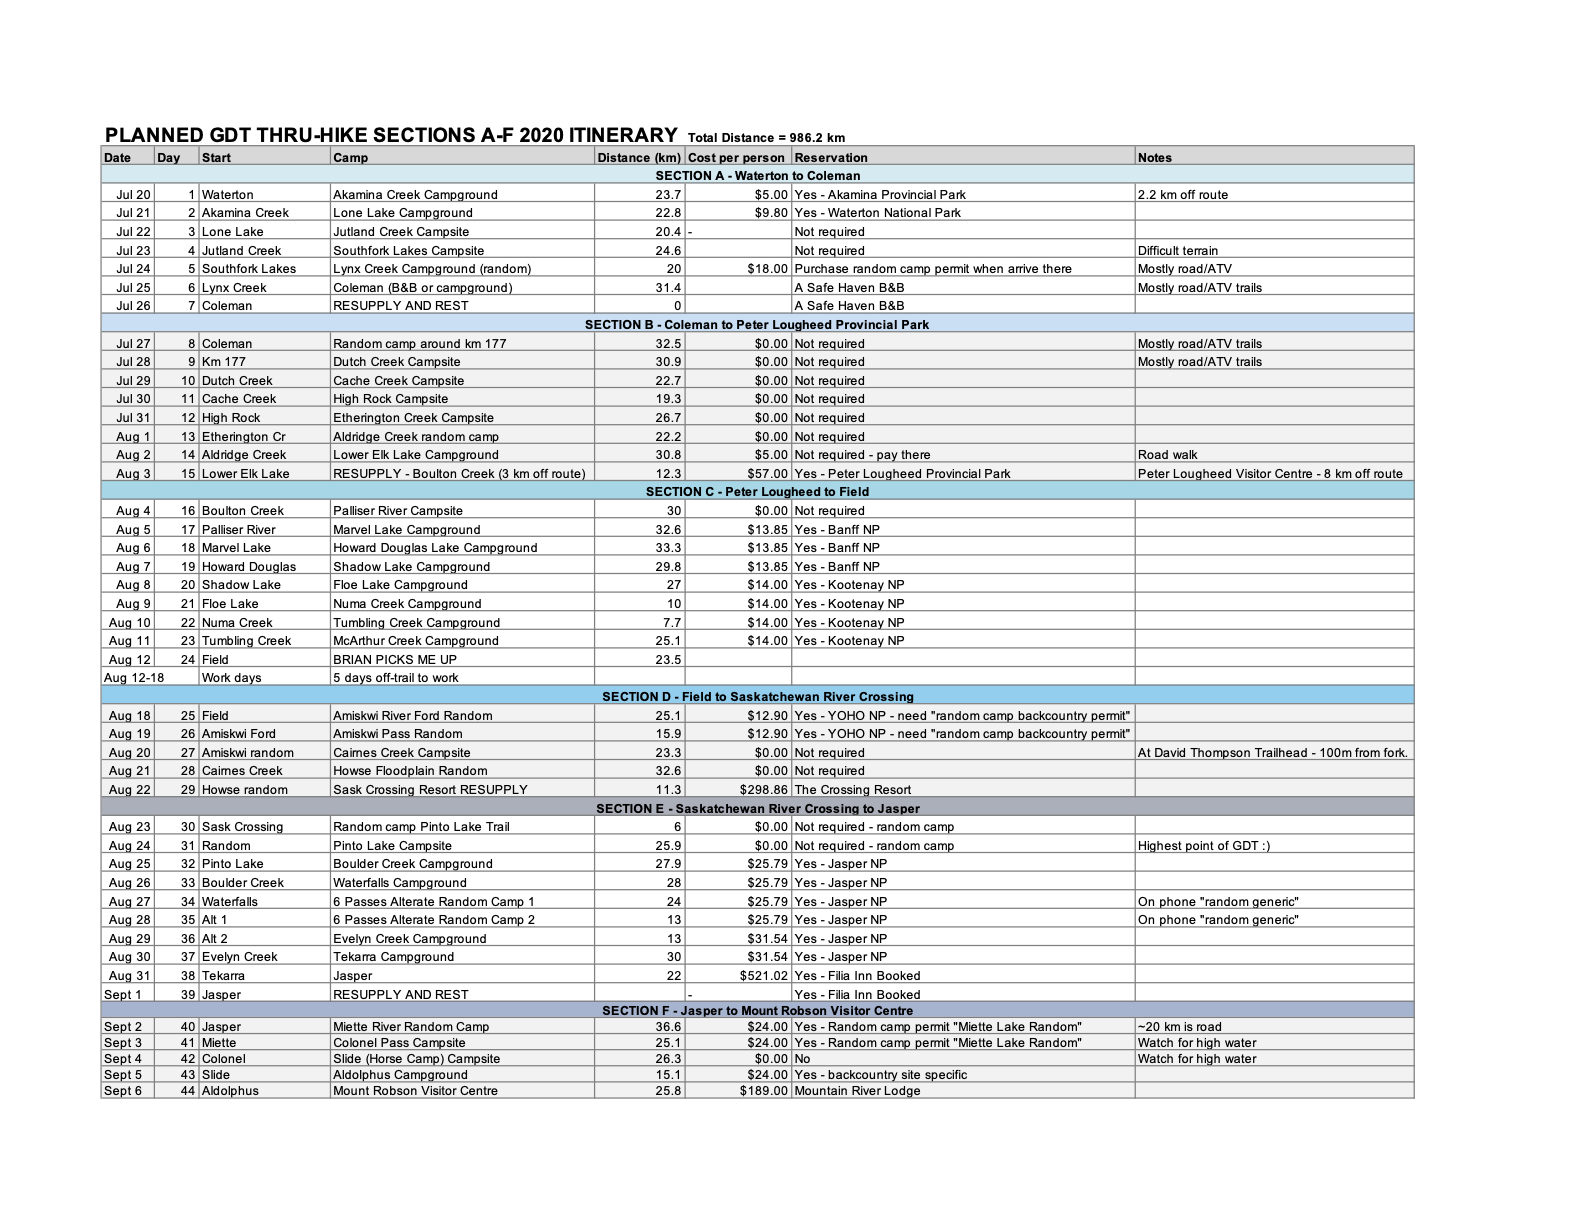
PLANNED ITINERARY
This is the itinerary I had planned up until the day before I started my hike. Please note: if you plan to use my itinerary as a guide, the most accurate and up-to-date itinerary will be my actual itinerary (find that below actual). But, I thought it might be interesting for you to see how my itinerary differed from planned to actual.
You will notice some shorter days on Section C, this was solely due to permit availability.
Planned Itinerary GDT 2020 - Download
ACTUAL ITINERARY:
If you plan to use my itinerary as a guide, use this one. This itinerary is updated with pertinent information I learned along the way on the trail.
I also included a legend that I wish I had prior to starting my hike. I outlined what each camp was like by deeming it a camp (random), campsite (usually only a few signs of previous campers) or campground (established site with tent pads, bear caches and cooking areas).
Things along the way that changed my plan:
Akamina Parkway closures due to reconstruction after forest fires. This made me start a day late and skip the first part of Section A. I had to start at the end of Red Rock Canyon Road instead.
High Rock Trail alternate opened a few days before I got to that section. I heard such rave reviews that I decided to do this alternate instead of the regular route.
We were never able to secure a permit for Tekarra on the Skyline Trail, so had to hike through the entire trail in a day.
Permits made it impossible for me to take a full day off between every section (which was honestly really tough physically).

Actual Itinerary GDT 2020 - Download
Love excel? You can download my entire Excel spreadsheet below. Modify as much as you need for your own itinerary. Hope this helps!
GDT-2020-Thru-Hike-Itinerary-Krysta - Download
Step 7: book your permits & accommodations
You should have a rough itinerary planned when starting to book your permits. It’s best to try to purchase your permits as soon as booking becomes available, but it’s not necessary.
When researching for this post, I couldn’t find exact dates for 2021 that the permitting will be opened. The National Parks said “April 2021.” I would advise checking back on the websites in January 2021 to see if there is any updated information. I suspect that COVID-19 will impact timelines.
In general, the Park’s Canada staff do not know about the Great Divide Trail. They generally won’t help you piece together the different permits from different Parks. In order to book a permit, they need to know which trailhead you will be accessing from. I did my research before and found the nearest trailhead to the campground I was trying to book for. I would just give them that trailhead, as they don’t have information from neighboring parks to look at.
I knew that if I needed to do a big day due to the lack of permits I could. That’s why you will see that I hiked several 30 km days. At this point in my hike, these days were possible in 7-9 hours. I’m glad I did it that way, but there are usually several campgrounds in between where I camped on those days if you are wanting shorter days.
You might not get every permit you need. I called one week ahead of arriving on the Rockwall Trail and was able to secure a final permit that I needed. Although I wouldn’t recommend the stress of leaving it last minute, I thought I would pass on that tid-bit of knowledge.
Here is a list of all the permits and accommodations I booked in advance of starting my thru-hike:

Download the PDF of my permits and bookings - Download
Step 8: plan your resupply points
Here is a summary of my resupply:

Resupply locations - Download
Yours will likely look different depending on your personal situation.
Step 8/9/10: start meal prep, gear prep, and training
These deserve separate posts!
Find my GDT 2020 Thru-Hike Gear List here.
Find my Meal Prep Blog post here.
Find my How to Plan Your Hiking Itinerary: Physiotherapy Tips here.
Watch my “How Physiotherapy Can Help You Prepare for Hiking Season” video:
I really hope you find this post helpful! It literally took me days and days to put all of these resources together, so I really hope you can benefit!